I’m going to show you how to make a foldable for your science textbook. This is an original, untested idea that I came up with on my own, so I have no idea if it’ll work or not. But I think it’s pretty clever, and I’d love to hear your thoughts on it!
This atom foldable is designed to be used alongside any textbook or curriculum. It can also be used as a companion to the booklet from the commercial listing below.
The Atom Foldable Layout
I’m going to start by showing you the layout of the four-flap foldable. (I’ve actually made this one before, but never posted it.)
The front side of the foldable will look like this:
There are four flaps labeled “Protons,” “Neutrons,” “Electrons,” and “Nucleus.” Beneath each flap, there will be prompts for notes. The particle flaps will have “Location” and “Charge” prompts, while the nucleus flap will have “Contents” as its prompt. Then beneath those labels, there will be spaces for notes. On the back of the foldable, there will be a space for the student to write notes about protons, neutrons, electrons, and the nucleus. There will also be some blank pages left over for whatever else the student wants to include in the booklet.
On the other side of the foldable, there will be a place for the student to write notes about the different parts of an atom. The booklet will be divided into sections for protons, neutrons, electrons, and the nucleus. Each section will have enough room to write down all the details and charges related to each of these particles.
Instructions and Templates from Knowledge Box Central
The commercial listing for this product includes instructions and templates for creating an atom anatomy foldable booklet. You can find it here.
The commercial booklet is available only as an ebook that you can print. You can find it here.
If you prefer having instructions and templates included, then the Knowledge Box Central version of the booklet is a good option. The listing does not confirm that atom explanations are included, so use your textbook or curriculum to fill in what you’re learning about atoms. Find it here.
Cutting and Folding the Paper
I’ll keep things simple and just use paper to construct this foldable. I’ll cut out a rectangle of paper, and then fold it in half. Then I’ll divide the front side into four equal areas. Three of those areas will be folded up to form the flaps. I’ll only make cuts through the front layer of the paper, and I’ll stop at the fold line. I won’t cut through the backing beneath the flaps because that would prevent me from being able to put notes under the flaps. So when I attach the flap to the lapbook, I’ll only be attaching the back of the flap to the lapbook. I’ll leave the front of the flap attached to the rest of the paper. I’ll want to make sure that I have plenty of clearance on the lapbook so that every flap has room to open.
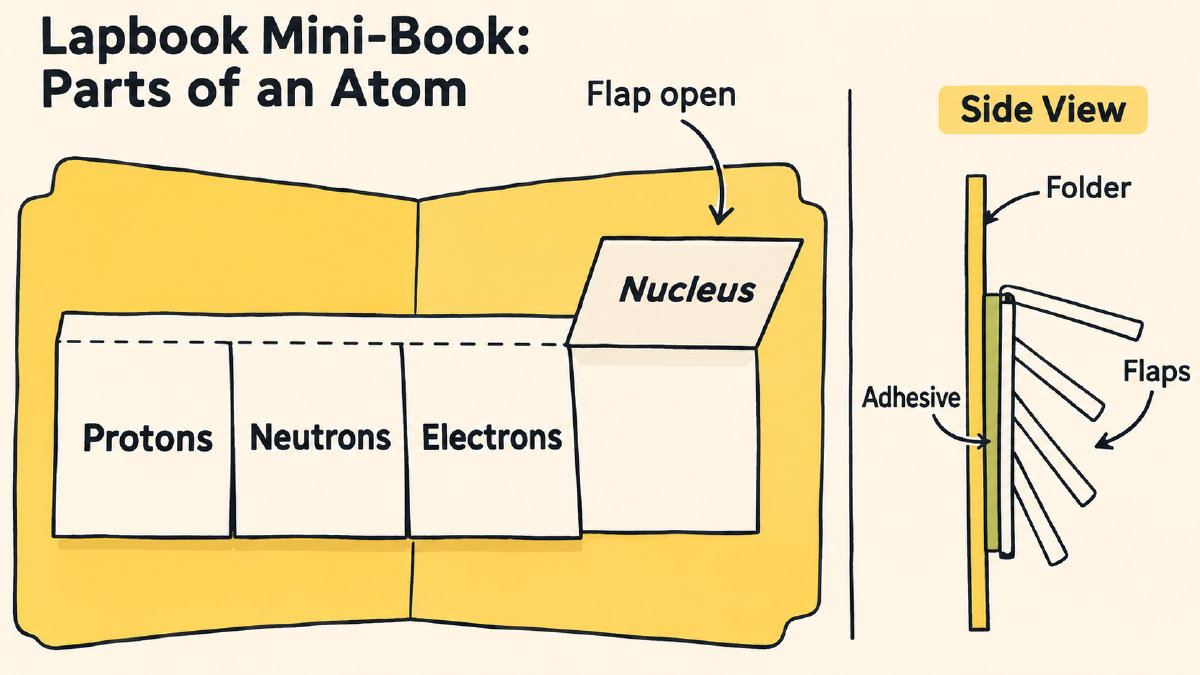
Here’s what it looks like when I’ve finished cutting out and folding the flaps. I’ll label the front of each flap. I’ll check that they open correctly and that the motion is smooth.
Adding Notes and Labels
On the back of the foldable, I’ll add notes about protons, neutrons, electrons, and the nucleus. Under the flaps, I’ll note that protons and neutrons form the nucleus, and electrons move around it within designated energy levels. I’ll put protons and neutrons under “Contents.”
Then I’ll flip the foldable over, and I’ll repeat the process for the other side of the foldable.
Now I’ll close the foldable and place it in my lapbook. I’ll want to make sure that I have plenty of clearance on the lapbook so that every flap has room to open.
Using the Foldable with Your Textbook
You can see that this foldable doesn’t exactly match up with the one from the commercial listing above. That’s okay. I don’t think they’re meant to be the same. They’re just two different ways to document the anatomy of an atom. One documents the anatomy, and the other documents the anatomy along with any additional details and charges that may be found in your textbook or curriculum. As I work through my textbook lesson, I’ll fill in the matching note spaces and include page numbers. Then I’ll close the flaps and use the labels to see what I remember before opening them to check my answers.