
I’ve made a couple of foldable snowflake templates for you. The first one is from FirstPalette, and the second one is from the Natural History Museum.
Free Foldable Snowflake Templates
If you’re not familiar with either of those sites, here’s a bit about them…
FirstPalette offers twelve free fold-and-cut templates along with illustrated instructions on how to cut out each design. They also have some blank templates where you can draw your own design in the indicated section. Here’s their webpage that contains all of their printable PDF downloads. You’ll need a PDF reader and thin white A4 or Letter paper. Their printables are for personal, non-commercial use only. You can’t alter or republish the PDFs, and they ask that you share links to the webpage containing them.
The Natural History Museum has ten free downloadable templates (including animal designs). They suggest starting simply, so I would choose a design with fewer small cuts. If you’d like to use these templates, be sure to read the publisher’s conditions for using and sharing the printable.
Folding and Cutting the Templates
So once you have the template printed out, it’s time to get cutting! And I know you’ll want to make sure you follow the instructions exactly as written. So let me take you through the process.
The main folding sequence for the FirstPalette template is documented right on their website, so I won’t repeat it here. However, just so you know, the general idea is to start by cutting out the square, then fold it diagonally in half into a triangle. Then fold it in half again, and continue folding until you end up with a small triangle shape. For those remaining folds, fold the sections backward as shown in FirstPalette’s instructions. From there, you’ll make your cuts while the paper is folded, then carefully unfold it. The key is to remember that any gray areas are the parts you need to cut away. You’ll need to be very careful when unfolding because the paper becomes more fragile the more you cut away.
For the Natural History Museum templates, they document the folding and cutting steps separately. For example, if you have the snowflake template, you’ll turn the template over, and then fold it diagonally along the blue line labelled ‘1’. Follow the museum’s blue fold lines and cut away the red areas of the design. Cut the smaller details before the large areas, and work on internal areas before external ones. Be careful not to leave parts of the design unsupported. You’ll need adult supervision when using sharp scissors.
Fitting the Cutout Inside a Lapbook
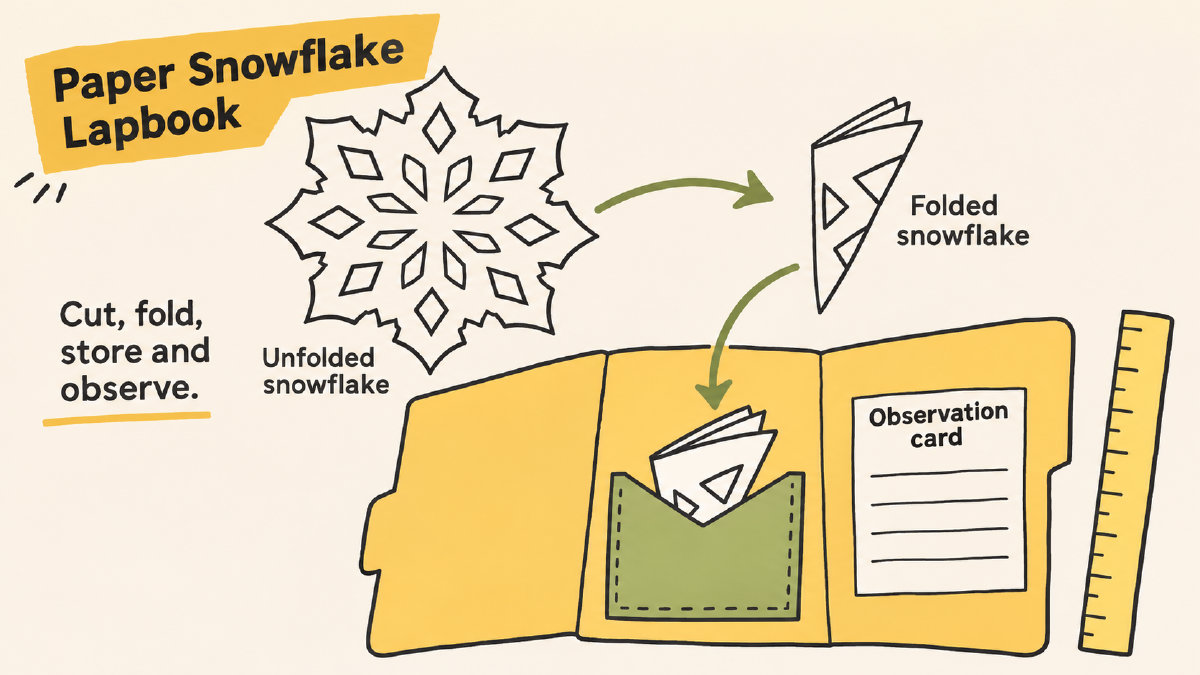
I’m going to show you my finished paper pattern model, but before I do, I should mention that I haven’t actually tested this in a lapbook yet. I wanted to show you what it might look like. So please keep in mind that this is an untested arrangement.
To begin, I would measure the opened cutout and make sure that it will fit inside the panel. If it doesn’t, then refold it along the existing creases. When I say “refold,” I mean that you don’t have to re-fold it to the original size. Just fold it so that it fits into the panel. Once it’s folded, you can measure it to make sure that it will fit into the pocket.
You can see how the cutout will fit inside the pocket by looking at this image below.
Once the cutout is placed inside the pocket, it can be removed easily. You could even leave the pocket open, and simply place the cutout inside. But I think that would require gluing the flap shut, and I prefer to avoid unnecessary glue in my lapbooks. I much prefer to use pockets that close with a folder.
So once the cutout is in the pocket, I would place the observation card beside the pocket. Then I would check to make sure that the flap closes properly before gluing it to the page. This way, the flap won’t tear off or fall apart when I go to remove the cutout later.
Of course, if you’re using the actual opened cutout and not a folded piece, you’ll have to measure it to make sure that it will fit in the pocket. It may be too large to fit in the panel, so you’ll have to decide whether you want to refold it, or if you’d rather use a different mounting arrangement. My suggestion would be to use a printable pocket from my site’s catalog of printable lapbook templates. That way, you can construct the pocket, and then mount the cutout on top of it. Or you can print a pocket from my site’s catalog, attach it to the page, and then mount the cutout on top of it. Either way, it’ll be a removable cutout that you can take out to observe.
Observing Patterns and Comparing Real Snowflakes
Observing the finished paper pattern is definitely fun. You can write down observations about the paper piece, such as how many repeated cut shapes there are, how many times the shape appears, and whether or not there are visible differences between the shapes.
But you can also compare your paper pattern to real-life snowflakes. According to NOAA, most snowflakes have six-fold radial symmetry. That means that there are six evenly spaced directions from the center of the snowflake. The shape along one direction is repeated along the other five directions.
They explain that this six-fold symmetry is due to the six-sided structure of ice crystals. It’s interesting to note that the same kind of symmetry is found in nature.
Of course, your decorative cut shapes aren’t perfect. There are imperfections in every one of them, and they’re all different. So when you’re observing your finished cutout, you can note things like the number of repeating shapes, the appearance count, and the visible differences between the shapes.