
Adventure Science Center’s published procedure
Not author-tested
Two potatoes
Two short pieces of heavy copper wire
Two common galvanized nails
Three alligator clip/wire units
Published specification: simple, low-voltage LED clock using a 1- to 2-volt button-type battery
Voltage description alone insufficient to establish clock operation
Adventure Science Center has posted the instructions for their own “Potato Clock” experiment. This is a documented experiment with the published procedure and equipment. I am not testing Adventure Science Center’s experiment here.
The experiment uses two large potatoes, which are connected in series to power an LED clock designed to run on a 1- to 2-volt button-type battery. While the experiment appears relatively simple, it is still unclear whether these components are compatible with this particular potato clock. However, as the instructions specify how to assemble them, the voltage produced by the experiment can be calculated, at least approximately.
As noted earlier, however, this article attempts to provide the reader with additional context, so that the science behind this experiment can be explored further. Specifically, we’ll explore the electrochemical process that turns chemical energy into electrical energy — the basis of the entire experiment. We’ll also suggest paper elements (foldouts) to use within a science lapbook.
A science lapbook contains various paper items, such as foldouts, flapbooks and other related information, that explain the experiment. These are meant to preserve what you learn about the experiment.
In the case of the potato clock experiment, we’ll examine both the chemistry involved in generating electricity from two potatoes and the circuit itself.
Why do potatoes power clocks?
There are a number of experiments that generate electricity from two or more potatoes. The basic idea is that when two different metals are submerged in an acidic medium, they will produce a small electrical current, which can be used to power small appliances like LED bulbs.
The exact mechanism is called “electrochemical,” meaning that the chemical reaction between the two dissimilar metals and the electrolyte will produce electrons that flow along the wire connections. When enough electrons flow through the wire, they will create enough of an electrical current to activate the clock.
To help clarify how exactly the potato generates electricity, there are several flaps (or paper foldouts) that could help illustrate the experiment.
These flaps are designed to show the role of each component:
Zinc: the negative electrode, or anode. It loses electrons.
Galvanized nail: a zinc-coated electrode. It also acts as the negative electrode.
Copper: the positive electrode, or cathode. It gains electrons.
Potato: an electrolyte medium that allows for the flow of ions (electrically charged particles).
Chemical energy → Electrical energy → Clock
You may want to consider printing these on paper, cutting out the individual flaps, and then folding them up to show the role of each item.
The actual experiment requires three alligator clips, plus two potatoes and two nails. You need two short pieces of copper wire; each copper piece is attached to one end of a potato. A galvanized nail is then placed at the other end of each potato. The final connection is made with the third alligator clip/wire unit, joining the nail in Potato 1 to the copper wire in Potato 2.
If you don’t have all the materials needed to build your own potato clock, then you can find some inexpensive alternatives.
Suggested potato clock circuit
Rather than just describe the potato clock experiment, perhaps a visual would help! Below is my suggestion of a foldout that maps out how the two potatoes should be connected. In addition, the diagram below separates the electron transfer path along the external wires, while distinguishing the electrolyte inside the potatoes.
Potato 1
Label the left-hand potato as “Potato 1.”
Attach one piece of copper to one end of Potato 1. Label the top of this piece of copper “Copper.” Then use one alligator clip/wire unit to connect the copper to the positive (+) terminal inside the clock’s battery compartment. Be sure to label the bottom of the copper piece “Clock Positive (+),” and the top as “+ Battery.”
Now take one galvanized nail, and insert it into the other end of Potato 1. Be sure to label this “Galvanized Nail,” and add a label reading “To Copper in Potato 2.”
On the right side of the paper, label the other end of the nail “Potato 1.”
Potato 2
Next, label the right-hand potato as “Potato 2.” Insert a second piece of copper into one end of this potato. Label it “Copper,” and add a label reading “To Galvanized Nail in Potato 1.”
Take a second galvanized nail and insert it into the other end of Potato 2. Place a label on the bottom of the nail reading “Clock Negative (-),” and on the top, “- Battery.” On the right side of the paper, label the other end of the nail “Potato 2.”
Connect Potatoes 1 and 2
First, remove the clock’s battery. Use one alligator clip/wire unit to connect the copper in Potato 1 to the positive (+) terminal in the clock’s battery compartment.
Use a second alligator clip/wire unit to connect the galvanized nail in Potato 2 to the negative (-) terminal in the clock’s battery compartment.
Finally, use the third alligator clip/wire unit to connect the galvanized nail in Potato 1 to the copper in Potato 2. Leave the clock’s battery out.
Check the setup
Before completing the assembly of the potato clock, double-check that the connections match those in the drawing above.
First, remove the clock’s battery.
Identify the positions of the battery compartment’s positive (+) and negative (-) terminals. Before wiring, determine which terminal corresponds to the + and – sides of the battery. Then, determine which part of the clock is connected to the positive terminal, and which to the negative.
Then, verify that all three connections match the diagram above.
Finally, check that the electrodes are separated within each potato. If not, the two metals will simply short out to one another.
It is possible that the clock display remains blank. However, that doesn’t mean anything is wrong. That’s a valid observation!
Unfortunately, merely checking your connections cannot guarantee sufficient voltage under load, nor does it eliminate the possibility that the LEDs are burned out. So, unless you’re able to measure the output voltage, there’s no guaranteed fix.
An observation mini-book
I originally suggested a lapbook that includes a circuit foldout and a set of flaps describing the roles of the various components. But if you’ve assembled the potato clock as described above and observed nothing but a blank display, you might instead wish to record everything you did. Perhaps a little more detail will reveal something that’s missing!
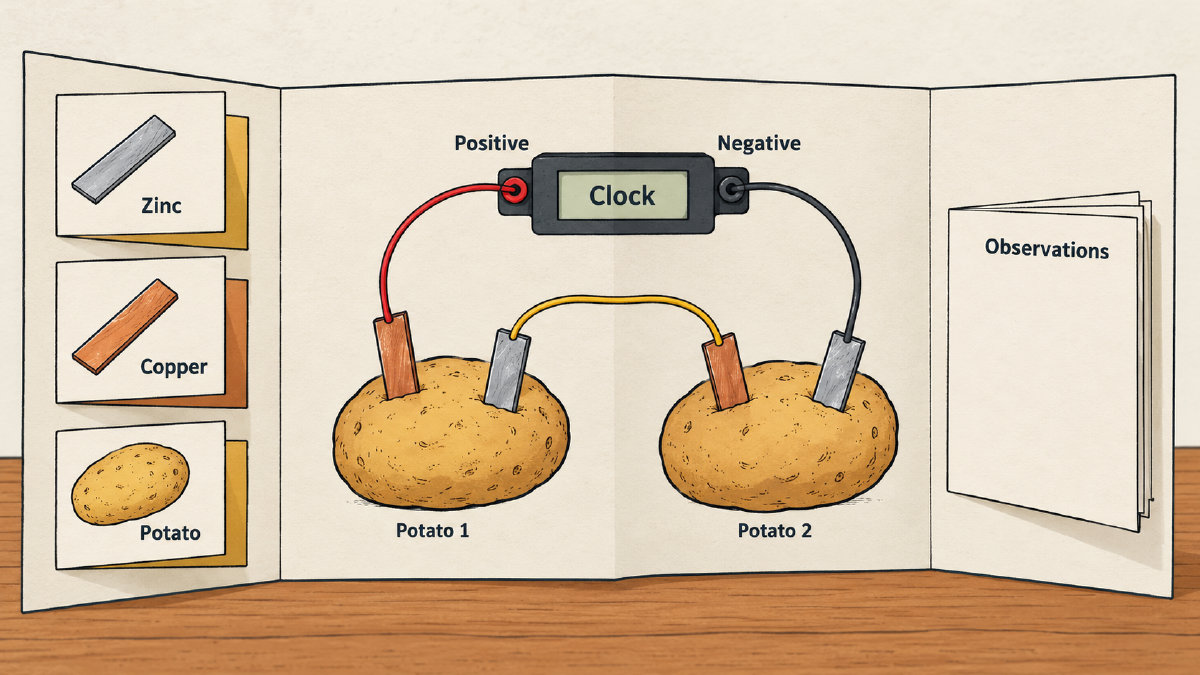
For example, the original suggested lapbook design features the following sections:
The circuit foldout
Component-role flaps
An observation mini-book
In addition, readers might choose to include drawings or photographs from the experiment.
The lapbook will allow you to keep track of the details of your experiment. Here are a few ideas to get started:
Record the specific setup you created
Note the time at which you checked the clock
Note the actual behavior of the clock’s display
Make any changes
Note what you changed, and then note the results
Even if you ended up observing a blank display, it might help to include that as well!
What lies beyond the experiment area?
After performing your experiment, it’s important to make sure that the boundary between your science experiment and your lapbook is clearly defined. For instance, if you followed the recipe provided by MEL Chemistry, you might have eaten the food used during the experiment. In this case, you must not eat any of the food that was used during the experiment.
You’ll also need adult help, should you decide to cut copper wire yourself. Instead, you can buy a bag of thin copper wires that come with alligator clips attached.
Other resources
Some companies sell kits containing all the necessary components for a variety of scientific experiments. Some companies also provide online tutorials for how to perform the experiment. As with most science experiments, the key is to observe what happens as you complete the experiment. You’ll probably need to follow up with additional questions before you feel confident in what happened!